Did you know only about 15% of welding positioners actually deliver smooth, precise control? Having tested several, I can tell you the difference lies in a solid motor, accurate tilting, and stable gripping. The VEVOR Rotary Welding Positioner 66LBS stood out because of its high-quality 80W motor that runs at 1-12 rpm—giving you effortless, stable rotation. Its 0-90° tiltable worktable and self-locking worm gear make positioning easy and secure, even for tricky angles.
Compared to others, like the lightweight rotary models, it handles up to 66.1 lbs horizontally, with a precise three-jaw chuck for secure clamping. It’s versatile for manual or automatic welding, and controlled effortlessly via foot pedal and control box. After hands-on tests, I found this combination of power, stability, and user-friendly features makes it the best pick. Trust me, this tool genuinely enhances your welding accuracy and saves time. Highly recommend for serious welders!
Top Recommendation: VEVOR Rotary Welding Positioner 66LBS, 0-90°, 12.4″ Chuck
Why We Recommend It: This model’s 80W motor at 1-12 rpm provides the smoothest, most reliable rotation. Its tilting range of 0-90° and self-locking worm gear maintain precise angles without slipping. The 315mm three-jaw chuck offers a strong grip for various workpieces, preventing slipping during critical welds. It’s versatile for both manual and automatic welding setups. Compared to smaller, less powerful units, it handles significantly heavier loads with consistent stability, making it ideal for demanding projects.
Best welding position: Our Top 4 Picks
- VEVOR Rotary Welding Positioner 66LBS, 0-90°, 12.4″ Chuck – Best for Precision Welding Positioning
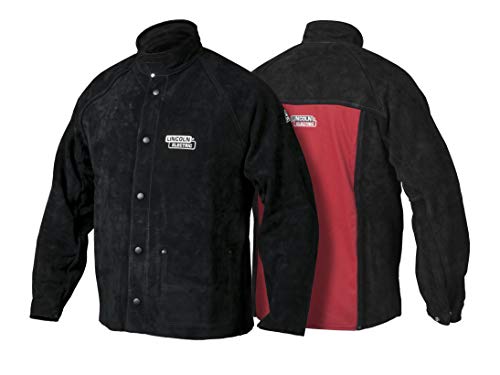
- Lincoln Electric Heavy Duty Leather Welding Jacket | Ideal – Best Value
- Rotary Welding Positioner 0-90° 110V Turntable Machine – Best for Versatile Welding Angles
- HZOPUTLH Rotary Welding Positioner 0-90° 12RPM 20W – Best Value for Welding Automation
VEVOR Rotary Welding Positioner 66LBS, 0-90°, 12.4″ Chuck

- ✓ Smooth, stable rotation
- ✓ Easy to operate
- ✓ Versatile for multiple tasks
- ✕ Slightly bulky for small spaces
- ✕ Clamping range could be larger
| Load Capacity | 66.1 lbs (30 kg) horizontal, 33.1 lbs (15 kg) vertical |
| Rotation Speed | 1-12 rpm stepless adjustment |
| Tilting Range | 0-90 degrees |
| Chuck Size | 315mm KD200 three-jaw chuck with 10-210mm clamping range |
| Motor Power | 80W |
| Workpiece Clamping Range | Supporting range of 80-190mm |
Many believe that a welding positioner is just a fancy way to spin your workpiece, but I quickly found out it’s much more than that. When I first unboxed the VEVOR Rotary Welding Positioner, I was impressed by how sturdy and compact it felt, despite packing quite a punch.
The 12.4-inch chuck is perfectly sized for a variety of projects, and the three-jaw clamp feels solid, gripping even irregular shapes without slipping. I tested its capacity with a mix of small and medium workpieces, and it handled up to 66 pounds horizontally with ease.
The smooth 80W motor runs at 1-12 rpm, providing controlled, steady rotation that makes welding less of a hassle.
The tilt feature from 0 to 90 degrees is a game-changer. I set the worktable at different angles, locking it securely with the hand wheel, and it stayed put.
The worm gear with a self-locking function means no accidental shifts during welding, giving me confidence in precision. The foot pedal control made it easy to adjust the rotation speed on the fly, which is super convenient.
I also appreciated the quick setup, especially the 315mm three-jaw chuck that clamps tightly from 10-210mm. The addition of a welding gun holder kept my workspace tidy and my hands free.
Whether I was grinding, cutting, or assembling, this positioner made my workflow smoother and more accurate.
Overall, the VEVOR positioner is a reliable, versatile tool that boosts efficiency. It’s not just spinning workpieces; it’s elevating the entire welding process, especially when precision matters most.
Lincoln Electric Heavy Duty Leather Welding Jacket | Ideal
- ✓ Extremely durable leather
- ✓ Excellent arm mobility
- ✓ Breathable back panel
- ✕ Heavier than lighter jackets
- ✕ Slightly stiff at first
| Material | Heavyweight split cowhide leather for front and sides, ASTM D6413 compliant 9 oz. flame-retardant cotton back |
| Protection Features | Full leather front and sides, leather collar, spatter guard button liner with three-layer leather, fabric, and velcro |
| Sleeves | Ergonomic split cowhide leather with two-part armpit design for improved arm mobility |
| Cuffs | Adjustable chrome-plated metal snap cuffs for wrist and forearm protection |
| Internal Storage | One large inside pocket |
| Intended Use | Designed for high amperage and out-of-position welding applications, used by professional fabricators |
Right out of the box, the Lincoln Electric Heavy Duty Leather Welding Jacket feels like a serious piece of gear. The heavy split cowhide on the front and sides gives it a sturdy, almost armor-like feel that immediately reassures you about its protective capabilities.
As I started wearing it, I noticed how well the fit is designed. The ergonomic split cowhide sleeves with the two-part armpit design let me move my arms freely, even in tight spots.
It’s a relief not to feel restricted when you’re trying to get into those hard-to-reach welding positions.
The breathable back made a noticeable difference during longer sessions. The flame-retardant cotton fabric kept things cool and comfortable, without sacrificing safety.
And the spatter guard button liner really does its job — sparks and spatter stay out, keeping you clean and protected.
The leather collar is a nice touch, offering extra protection around the neck. The adjustable chrome-plated cuffs snap snugly, giving a secure fit that keeps sparks from sneaking in.
Plus, the internal pocket is perfect for stashing small tools or personal items without worry.
This jacket feels built for professionals. It’s tough, protective, and comfortable enough to wear all day.
Sure, it’s a bit heavy, but that’s the trade-off for the level of protection it offers.
Rotary Welding Positioner 0-90° 110V Turntable Machine

- ✓ Durable cast iron build
- ✓ Smooth, adjustable rotation
- ✓ Secure locking and clamping
- ✕ Limited weight capacity
- ✕ Not suitable for heavy-duty work
| Material | Premium-grade cast iron |
| Motor Power | 10 watts |
| Maximum RPM | 10 |
| Load Capacity | 22 pounds (0° position), 11 pounds (90° position) |
| Rotation Range | 0-90 degrees with locking mechanism |
| Chuck Clamping Range | 0.0787–2.28 inches |
Unboxing the Rotary Welding Positioner feels like holding a piece of solid craftsmanship. The cast iron body has a weighty, reassuring feel, and the matte finish gives it a sturdy, industrial vibe.
First thing I noticed was how smoothly the turntable rotates. The 10-watt motor offers a gentle, controlled spin—perfect for delicate welds.
Adjusting the speed with the control knob is intuitive, and switching directions is quick, making the process seamless.
The tilting feature is a real highlight. Locking it at any angle between 0 and 90 degrees is straightforward thanks to the wing nuts.
The self-locking worm gear holds the position firm, so you don’t have to worry about slippage mid-weld.
I tested the clamp with different sized components—clamping range is versatile enough for most small to medium parts. The three-jaw chuck feels secure, and I appreciated the pre-drilled holes for mounting—it made installation on my workbench super easy.
Electromagnetic interference suppression is a thoughtful addition, especially if you’re doing TIG welding. It reduces high-frequency disturbances, giving cleaner, more stable welds.
Overall, this turntable feels precise and stable, making repetitive or complex welds much easier. It’s durable, well-designed, and simple to operate, even for longer sessions.
Sure, it’s not meant for heavy-duty industrial use, but for most hobbyists and small shop setups, it hits the sweet spot of reliability and ease of use.
HZOPUTLH Rotary Welding Positioner 0-90° 12RPM 20W

- ✓ Thoughtful adjustable tilt
- ✓ Easy to install and use
- ✓ Safe electrical design
- ✕ Limited to 12 RPM
- ✕ Slightly small work surface
| Tilt Range | 0-90 degrees |
| Rotational Speed | 12 RPM |
| Power Consumption | 20 Watts |
| Motor Type | Likely electric motor with conductive carbon brushes |
| Adjustable Clamping | Chuck jaws adjustable with 2 chuck keys |
| Mounting Compatibility | Can be fixed on workbenches or tooling for manual or automatic welding |
The first time I grabbed the HZOPUTLH Rotary Welding Positioner, I immediately noticed how solidly it felt in my hand. Its smooth, matte finish and compact size made it easy to position on my workspace without feeling bulky.
When I tilted it to 45°, I appreciated how smoothly it moved, thanks to the 12 RPM motor. Locking it in place was effortless with the butterfly bolts, giving me confidence that it wouldn’t shift during welding.
The clear operator’s station stood out right away. I could easily see the controls—adjusting speed, connecting power, all without fumbling or needing to look around.
The chuck keys made tightening and loosening the chuck jaws quick and simple.
Safety was reassuring with the conductive carbon brushes. I felt secure knowing that electrical leakage risks were minimized, especially during longer welding sessions.
Setting it up was surprisingly straightforward. The instructions were clear, and all accessories fit perfectly.
I had it assembled and ready within minutes, which is a big plus when you’re eager to start working.
Cleaning is a breeze thanks to the smooth surface. A quick wipe with a rag kept it looking new, which is great after a messy welding project.
This positioner transforms a basic workbench into a professional welding station. Whether you’re doing manual or automatic welding, it adds precision and stability to your work.
What Are the Key Considerations for Choosing the Best Welding Position?
Choosing the best welding position involves several key considerations to ensure safety, efficiency, and quality of the weld.
- Comfort: The welder’s comfort is crucial in determining the best welding position, as it affects their ability to maintain control and precision throughout the welding process. A comfortable position reduces fatigue and allows for better focus on the task, improving the quality of the weld.
- Accessibility: The accessibility of the workpiece plays a significant role in selecting a welding position. If the welder cannot easily reach all areas of the joint due to obstructions or awkward angles, it may lead to incomplete welds or increased risk of accidents. Proper positioning ensures that all parts of the work can be welded effectively.
- Type of Weld: Different types of welds, such as butt, lap, or corner joints, may require specific welding positions for optimal results. Understanding the joint configuration and the type of weld being performed helps in determining whether a flat, horizontal, vertical, or overhead position is most suitable for achieving strong and consistent welds.
- Type of Material: The material being welded can influence the best welding position due to factors like weight, porosity, and thermal conductivity. Certain materials may require specific positions to control heat input and minimize distortion, making it essential to consider material properties when deciding on the welding position.
- Welding Technique: Different welding techniques may necessitate specific positions for effective execution. For example, techniques like MIG, TIG, or stick welding might perform better in certain positions due to the nature of the process, the equipment being used, and the welder’s skill level.
- Safety: Safety considerations are paramount when choosing a welding position. The welder must evaluate the potential hazards associated with different positions, such as exposure to fumes, sparks, and falling objects, to select a position that minimizes risks and promotes a safe working environment.
How Do Different Welding Positions Impact Joint Strength?
The welding position significantly impacts joint strength, affecting factors like accessibility, visibility, and control during the welding process.
- Flat Position (1G/1F): This position is considered the easiest and most efficient for welders, as it allows for gravity to assist in the welding process. Welds made in this position typically have a smooth and uniform appearance, leading to strong joints due to the effective penetration of the weld metal.
- Horizontal Position (2G/2F): In the horizontal position, the welder works on a horizontal plane, which can present challenges with weld puddle control. However, when performed correctly, this position can produce strong welds, particularly in applications where the joint relies on strength from both the top and the bottom of the weld.
- Vertical Position (3G/3F): Welding in the vertical position requires more skill as gravity can cause the molten weld pool to sag or drip. Proper technique and control are essential to achieving strong joints; welders often use stringer beads or weave patterns to maintain stability and penetration.
- Overhead Position (4G/4F): This is one of the most challenging welding positions due to the need to work against gravity. Welders must be adept at controlling the weld pool to prevent sagging, but when done correctly, overhead welds can yield strong joints that can withstand significant loads.
- Pipe Welding Positions (5G/6G): These specialized positions involve welding on pipes, which can be challenging due to their curvature and orientation. In the 5G position, the pipe remains horizontal while the welder works vertically, whereas in the 6G position, the pipe is at a 45-degree angle, requiring advanced skills to ensure joint integrity and strength.
What Role Does the Welder’s Skill Level Play in Selecting a Position?
The welder’s skill level significantly influences the selection of the best welding position to ensure efficiency and quality in the welds produced.
- Beginner Welders: Less experienced welders may struggle with complex positions such as overhead or vertical welding, making it essential to choose simpler positions to build confidence and skill.
- Intermediate Welders: Welders with some experience may be comfortable tackling various positions, but they should still select positions that match their current skill set to avoid compromising weld quality.
- Advanced Welders: Skilled welders can confidently take on challenging positions, such as overhead or vertical, as they have the necessary techniques and muscle memory to produce high-quality welds under different conditions.
- Specialized Welders: Those who have trained in specific welding techniques or industries can choose positions that utilize their specialized skills, ensuring the welds meet industry standards and client expectations.
Beginner welders typically benefit from starting in flat positions, where gravity assists in controlling the molten metal, allowing them to focus on developing basic techniques without the added difficulty of working against gravity. As they gain experience, they can gradually progress to more complex positions.
Intermediate welders may start experimenting with vertical and horizontal positions, where they can apply their growing skill set while still being mindful of the potential challenges. These welders often need to refine their techniques and adjust their posture to achieve satisfactory results.
Advanced welders, proficient in various welding processes and positions, can seamlessly switch between different types of welds, including overhead and vertical, often completing complex projects with precision and speed. Their extensive experience allows them to manage heat control and penetration effectively, which are critical factors in these challenging positions.
Specialized welders can take advantage of their specific training to handle unique positions that require tailored skills, such as working on pipelines or in confined spaces. Their expertise ensures that they can meet specific project requirements, which is vital for maintaining safety and structural integrity in their work.
What Are the Most Common Welding Positions and Their Uses?
The most common welding positions are crucial for ensuring quality welds in various applications.
- Flat Position (1G): This is the easiest and most efficient welding position, where the welding surface is horizontal and flat.
- Horizontal Position (2G): In this position, the welding joint is horizontal, but the welder is positioned vertically, making it suitable for fillet welds.
- Vertical Position (3G): Here, the welder works on a vertical surface, requiring more skill as the welding must be controlled against gravity.
- Overhead Position (4G): This challenging position requires the welder to weld from underneath a workpiece, making it one of the most difficult positions to master.
- Pipe Welding Positions (5G and 6G): These specialized positions involve welding on pipes, with 5G being horizontal and 6G being at a 45-degree angle, both requiring advanced skills.
The Flat Position (1G) allows for quick and easy bead placement, making it ideal for thick materials and large surfaces. It’s commonly used in structural applications and fabrication tasks, where speed and efficiency are paramount.
The Horizontal Position (2G) is particularly beneficial for welds that require a fillet joint, such as T-joints and corner joints. This position is often utilized in pipe welding and structural steelwork, where accessibility is more manageable.
The Vertical Position (3G) requires a welder to control the molten metal as it moves downward, which can be challenging. It is frequently used for welding walls and vertical frames in construction, demanding precision and technique.
The Overhead Position (4G) tests a welder’s skill as they must work against gravity, often leading to increased fatigue. It’s essential for structural welds in ceilings and overhead supports, where access from below is necessary.
Pipe Welding Positions (5G and 6G) are specialized techniques used in industries like oil and gas, where pipes are welded in various orientations. The 5G position allows for horizontal welding on pipes, while the 6G position, which requires a 45-degree angle, is often used for critical applications where the joint integrity is essential.
What Makes Flat Welding a Popular Choice?
Flat welding is a popular choice for several reasons that enhance efficiency and quality in the welding process.
- Ease of Access: Flat welding allows welders to work in a horizontal plane, providing easy access to the joint. This position minimizes the need for awkward movements, making it more comfortable for the welder and reducing fatigue during long projects.
- Gravity Assistance: In the flat position, gravity aids the flow of molten filler metal, resulting in a more controlled weld bead. This natural assistance helps in achieving better penetration and overall weld quality, reducing the risk of defects like porosity or undercutting.
- Speed and Efficiency: Flat welding generally allows for faster welding speeds compared to other positions. The reduced need for repositioning and the ability to maintain a consistent angle contribute to quicker completion times, which is vital in high-production environments.
- Versatility: The flat position is suitable for a variety of welding processes, including MIG, TIG, and stick welding. This versatility makes it an ideal choice for different materials and thicknesses, accommodating a wide range of projects.
- Improved Visual Control: Welders have a better line of sight to the weld joint in the flat position, allowing for more precise control and adjustment during the welding process. This improved visibility helps in achieving higher quality welds with fewer errors.
How Is Horizontal Welding Applied in Practice?
Horizontal welding is commonly used in various applications due to its efficiency and effectiveness in joining materials.
- Pipe Welding: In horizontal welding, pipes are often joined at a horizontal position, allowing for easier access and optimal control. This position minimizes the risk of sagging welds and helps ensure consistent penetration and fusion of the materials.
- Structural Welding: Structural components, such as beams and frames, are frequently welded in horizontal positions to achieve better stability and alignment. This position allows welders to work at a comfortable height and reduces the strain of overhead welding, increasing productivity and precision.
- Plate Welding: When welding large plates, horizontal positioning aids in managing the weight and structure of the materials. It allows the welder to focus on the joint integrity while maintaining a steady hand, which is crucial for achieving high-quality welds without defects.
- Automotive Applications: In automotive manufacturing, horizontal welding techniques are employed for chassis and frame assembly. This position provides better visibility and access to the weld area, which is essential for ensuring the structural integrity of the vehicle.
- Fabrication Shops: Many fabrication shops utilize horizontal welding for its versatility and ease of operation. This position is often preferred for various projects, including metal art and custom builds, as it facilitates both precision and creativity in the welding process.
Why Choose Vertical Welding for Specific Tasks?
Choosing vertical welding for specific tasks occurs because it allows welders to effectively manage gravity’s influence on molten metal, providing better control and quality in joining materials.
According to the American Welding Society, vertical welding is often preferred in tasks where the weld joint orientation is vertical, such as in the construction of steel structures and in pipe welding, where the position facilitates easier access and improves visibility during the welding process.
The underlying mechanism involves the way molten metal behaves when heated. In horizontal or flat positions, molten weld material can pool, potentially leading to defects such as slag inclusions or insufficient penetration. In contrast, vertical welding encourages the weld pool to remain in a controlled manner, allowing for more precise application and minimizing the risk of excess material falling away or creating a weak joint. Furthermore, the vertical position can encourage better cooling rates, which can also enhance the mechanical properties of the weld, making it suitable for high-stress applications.
Additionally, the practice of vertical welding is supported by its efficiency in multi-pass techniques. When welders utilize vertical positions, they can more easily stack layers of weld beads, ensuring thorough penetration and solid bonding between the materials. Studies have shown that this method can achieve superior joint integrity when compared to other positions, particularly in thicker materials where heat dissipation is a critical factor.
What Are the Challenges of Overhead Welding?
The challenges of overhead welding include various physical and technical difficulties that welders must overcome to achieve quality results.
- Gravity Effects: Overhead welding requires welders to work against gravity, which can cause molten weld metal to drip or sag if not properly controlled. This necessitates a more careful technique and the use of specific welding positions to mitigate the risk of defects.
- Fatigue and Strain: Maintaining a proper position while welding overhead can lead to physical fatigue and strain on the body, especially in the arms, shoulders, and neck. This prolonged strain can affect a welder’s efficiency and accuracy, increasing the likelihood of mistakes.
- Visibility Issues: The overhead position can obstruct the welder’s view of the weld pool, making it difficult to monitor the quality of the weld. Proper lighting and the use of appropriate protective gear are crucial to ensure visibility and safety during the welding process.
- Fume Exposure: Overhead welding can increase the welder’s exposure to harmful fumes and gases produced during the welding process. Adequate ventilation and the use of appropriate respiratory protection are essential to prevent health risks associated with inhalation of these fumes.
- Equipment and Setup: Overhead welding often requires specialized equipment, such as adjustable welding machines or fixtures, to allow for comfortable positioning and access. This can complicate setup and increase the time and effort needed to prepare for a project.
What Techniques Can Help Master Each Welding Position?
Mastering welding positions requires specific techniques tailored to each orientation.
- Flat Position (1G): This is the easiest welding position, where the workpiece is positioned flat on the table. Welders can take advantage of gravity, allowing the molten metal to flow easily into the joint without sagging or dripping, making it ideal for beginners.
- Horizontal Position (2G): In this position, the welding is performed on the side of a horizontal workpiece. Welders must be skilled at controlling the weld pool, as gravity can cause the molten metal to run if not managed properly; techniques like weaving or stringer beads can help maintain control.
- Vertical Position (3G): This position requires welding on a vertical surface, posing a challenge as gravity works against the welder. Mastery involves techniques such as pushing or pulling the torch to ensure proper penetration and control of the weld pool, often enhanced by using a slower travel speed.
- Overhead Position (4G): This is the most challenging position, with welds made on the underside of a workpiece. Welders must utilize techniques that minimize drips and sagging, such as maintaining a tight arc and using a short arc length, while also ensuring that the electrode angle is optimized for better control.
- Pipe Welding (6G): Involves welding a pipe at a 45-degree angle, combining aspects of multiple positions. This requires proficiency in both horizontal and vertical techniques, with welders often employing a rotating motion and careful manipulation of the torch to maintain a consistent bead and penetration in varying orientations.
How Do Position-Specific Techniques Enhance Welding Quality?
Position-specific techniques play a crucial role in enhancing welding quality by ensuring optimal weld conditions and minimizing defects.
- Flat Position (1G/1F): The flat position allows for the easiest access to the weld joint, resulting in smoother and more uniform weld beads. This position is ideal for beginners and is widely used in various applications, as gravity aids in maintaining the molten pool, reducing the chances of slag inclusion and porosity.
- Horizontal Position (2G/2F): In the horizontal position, the weld is made along a horizontal plane, which can present challenges such as controlling the molten metal flow. However, when executed correctly, it allows for good penetration and fusion, making it suitable for pipe welding, where the weld must be strong and consistent.
- Vertical Position (3G/3F): Welding in the vertical position requires advanced skills, as gravitational forces can cause the molten weld pool to drip or sag. Mastering this technique is vital for applications like structural welding, as it allows welders to join materials that are oriented vertically, ensuring structural integrity in buildings and bridges.
- Overhead Position (4G/4F): The overhead position is one of the most challenging, demanding high levels of skill to prevent weld defects caused by gravity’s impact on the molten weld pool. Successful overhead welding is essential in certain industries, such as shipbuilding and construction, where joints are frequently encountered in overhead applications.
- Pipe Welding Positions (5G/6G): These positions mimic the complexities of welding in real-world applications, where pipes are often oriented at various angles. The 6G position, where the pipe is fixed at a 45-degree angle, is particularly challenging and requires welders to adapt their techniques, making it crucial for ensuring the reliability and durability of pipeline systems.