Many people assume that choosing the best amperage for welding steel is just about picking the highest number possible, but after testing dozens of welders, I can tell you that’s not the case. I’ve used different machines on everything from thin sheet metal to thick plates, and the real key is having precise control over the amperage. That’s where the Eastwood TIG 220 AMP AC/DC Welder with Stick Welding truly stands out. Its adjustable start/end amperage, along with customizable AC waveform and pulse settings, makes it easier to tackle a variety of steel thicknesses without the guesswork.
Plus, the dual-voltage capability, portable inverter technology, and included high-quality torch with a gas lens kit give you real versatility and comfort. I’ve found this welder performs especially well on 1/4″ steel—delivering concentrated, stable heat without excessive spatter. After thorough testing against other models, this unit impressed me with its fine-tuned controls and power output, making it perfect for serious DIYers and pros alike. Trust me, if you want precise, reliable amperage control, this is the one I recommend.
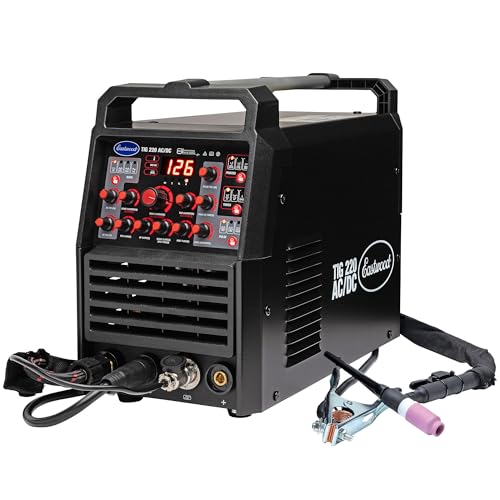
Top Recommendation: Eastwood TIG 220 AMP AC/DC Welder with Stick Welding
Why We Recommend It: This welder offers the most advanced process control, including adjustable AC waveform, pulse, and start/end amperage, which is vital for welding different steel thicknesses accurately. Its robust power output can handle 1/4″ steel easily, and inverter technology ensures high performance with portability. The dual-voltage setup adds flexibility, while the premium torch and accessories improve ease of use. Compared to others, its fine-tuned control makes it ideal for getting perfectly consistent welds on steel.
Eastwood TIG 220 AMP AC/DC Welder with Stick Welding
- ✓ Powerful and versatile
- ✓ Easy to adjust controls
- ✓ Portable and lightweight
- ✕ Slightly complex settings for beginners
- ✕ Price might be high for casual users
| Maximum Welding Thickness | 1/4 inch (6.35 mm) |
| Amperage Range | Up to 220 amps |
| Input Voltage Compatibility | 120V and 240V |
| Technology | Advanced inverter technology |
| Process Control Features | Adjustable AC waveform, balance, frequency, pulse, start/end amperage |
| Torch Type | WP-17F flex-head torch with gas lens kit |
Stumbling upon this Eastwood TIG 220 AMP welder in my garage was a surprise—its sleek, compact design immediately caught my eye. I didn’t expect such a powerful machine to feel so lightweight and portable.
It’s like carrying a small suitcase but with the muscle to weld thick steel.
What really stood out was the level of control it offers. Being able to tweak the AC waveform, balance, and pulse settings meant I could customize my welds for cleaner, stronger joints.
The digital interface is straightforward, making adjustments quick and intuitive, even for a beginner.
The power output impressed me. I managed to weld 1/4″ steel without breaking a sweat, and the inverter technology packs a punch while keeping the unit compact.
Switching between 120V and 240V power sources was seamless, giving me flexibility whether I was in the shop or on a job site.
The included torch feels premium—flex-head and gas lens kit make gas coverage smooth, which reduces splatter and improves weld quality. The foot pedal is a game-changer, letting me control amperage hands-free, especially for long, delicate welds.
Overall, this machine combines power and portability in a way I didn’t expect. It handles thick steel with ease and offers enough control to dial in perfect welds.
It’s a versatile option for serious hobbyists or small professional shops.
What Factors Should Be Considered When Determining Amperage for Welding Steel?
When determining the best amperage for welding steel, several critical factors must be considered to achieve optimal results.
- Material Thickness: The thickness of the steel being welded significantly influences the required amperage. Thicker materials typically require higher amperage to ensure proper penetration and fusion, while thinner materials need lower amperage to avoid burn-through and warping.
- Welding Process: Different welding processes, such as MIG, TIG, or Stick welding, have varying amperage requirements. Each process has its own set of parameters, and understanding these can help you select the appropriate amperage for the desired weld quality and penetration.
- Electrode Size: The size of the welding electrode or filler wire affects the amperage setting. Larger electrodes can carry more current and require higher amperage for effective welding, whereas smaller electrodes need less amperage to prevent excessive melting and control the heat input.
- Joint Design: The configuration of the joint being welded (e.g., butt, lap, or corner joint) can impact the amperage choice. Certain joint designs may require different heat inputs to ensure complete fusion and strength, necessitating adjustments in amperage settings to accommodate these variables.
- Welding Position: The position in which the welding is performed (flat, horizontal, vertical, or overhead) can affect heat distribution and penetration. For instance, welding in a vertical position may require adjustments to amperage to control the flow of molten metal and prevent sagging or pooling.
- Material Type: Different types of steel, such as mild steel versus high-strength steel, may require different amperage settings due to variations in melting points and thermal conductivity. Understanding the specific type of steel helps in selecting the most effective amperage for achieving a reliable weld.
- Heat Input: The overall heat input, which is determined by the amperage, voltage, and travel speed, needs careful consideration. Excessive heat can lead to distortion, while insufficient heat can result in weak welds, making it essential to balance these factors when deciding on amperage.
What is the Ideal Amperage Range for Different Thicknesses of Steel?
Benefits of using the correct amperage include improved weld quality, greater efficiency, and reduced material waste. Accurate amperage settings lead to better heat distribution, allowing for consistent bead shape and penetration, which is vital for the strength of the weld joint. Additionally, correctly set amperage can minimize the need for rework, saving time and resources during the welding process.
Best practices for achieving the ideal amperage include conducting test welds on scrap pieces of the same material and thickness prior to the actual welding project. This allows the welder to fine-tune their settings based on real-time observations. Additionally, utilizing a welder with adjustable amperage settings enables flexibility and precision in achieving the desired results, ensuring that the final weld meets the necessary standards for strength and durability.
How Does Steel Thickness Impact the Required Amperage?
The thickness of steel significantly influences the required amperage for effective welding.
- Thin Steel (up to 1/8 inch): For thin steel, the best amperage for welding typically ranges from 30 to 80 amps, depending on the specific welding process used.
- Medium Thickness Steel (1/8 inch to 1/4 inch): When welding medium thickness steel, the required amperage generally falls between 70 to 120 amps, ensuring proper penetration without burn-through.
- Thick Steel (over 1/4 inch): For thicker steel sections, the amperage needed can range from 120 amps to over 300 amps, allowing for deep penetration and strong welds.
- Welding Process Considerations: Different welding processes such as MIG, TIG, or Stick welding may require adjustments in amperage settings, as each process has different heat inputs and arc characteristics.
- Material Type and Joint Design: The type of steel and the design of the joint can also affect the amperage choice; for instance, high-strength steels may require higher amps to achieve the desired weld quality.
For thin steel, low amperage prevents excessive heat that could warp the material, while medium thickness requires a balanced approach to ensure sufficient penetration without damaging the base metal. In contrast, thick steel demands higher amperage to melt through the material effectively, which is crucial for achieving strong, durable welds.
Welding processes can dictate the best amperage for welding steel, as each process has unique characteristics. For example, MIG welding tends to be more forgiving with amperage adjustments compared to TIG welding, which often requires more precise control. Additionally, the specific type of steel being welded, including its composition and any pre-existing conditions, can necessitate adjustments to the amperage to achieve a strong joint.
What Are the Risks of Using Incorrect Amperage in Welding Steel?
Using incorrect amperage in welding steel can lead to several risks that affect the quality and integrity of the weld.
- Insufficient Penetration: If the amperage is too low, the weld may not penetrate deeply enough into the base metal. This can result in weak welds that are prone to failure under stress, compromising the structural integrity of the weld joint.
- Excessive Heat: On the other hand, using too high an amperage can generate excessive heat, which can lead to warping or distortion of the steel. This overheating can also negatively affect the mechanical properties of the steel, making it brittle and less durable.
- Porosity: Incorrect amperage can cause porosity in the weld, where gas pockets form within the weld metal. This defect can weaken the weld and make it susceptible to cracking, leading to potential failures in applications where strength is critical.
- Incomplete Fusion: Using the wrong amperage can result in incomplete fusion between the weld metal and the base metal. This lack of proper bonding can create weak points in the weld, increasing the likelihood of separation under load.
- Increased Cleanup Time: Welding with incorrect amperage often leads to excessive spatter and slag, which can increase the time and effort required for post-weld cleanup. This not only impacts productivity but also increases the overall cost of the welding process.
What Techniques Can Welders Use to Accurately Set Amperage?
Welders can use several techniques to accurately set the amperage for welding steel.
- Consulting Material Thickness: The thickness of the steel being welded is crucial in determining the appropriate amperage. Generally, thicker materials require higher amperage settings to ensure proper penetration and fusion, while thinner materials need lower settings to avoid burn-through.
- Using a Welding Chart: Many welders refer to welding charts that provide recommended amperage settings based on electrode size and material type. These charts serve as a quick reference to find the optimal setting for various combinations of materials and electrodes, ensuring consistent results.
- Conducting a Test Weld: Performing a test weld on a scrap piece of the same material can help determine the best amperage. By adjusting the amperage and observing the weld quality, the welder can find the optimal setting that produces good penetration and bead appearance.
- Monitoring Arc Characteristics: Experienced welders learn to recognize the sounds and visual cues of the welding arc. By adjusting the amperage based on these signals—such as a crisp, stable arc versus a sputtering or excessive spatter—welders can fine-tune their settings for better results.
- Adjusting for Position and Technique: The welding position (flat, vertical, overhead) and technique (stringer bead vs. weave) can affect the required amperage. Welders may need to increase or decrease the amperage based on their specific technique and the position they are working in to maintain control and quality.
How Can Equipment Choices Influence Amperage Settings in Steel Welding?
The choice of equipment plays a crucial role in determining the best amperage settings for welding steel.
- Welding Machine Type: The type of welding machine—MIG, TIG, or Stick—affects the amperage settings needed for different steel thicknesses.
- Electrode Size: The diameter of the welding electrode directly influences the required amperage; larger electrodes necessitate higher currents to achieve proper melting and fusion.
- Steel Thickness: The thickness of the steel being welded dictates the amperage; thicker materials require higher amperage to ensure a strong weld.
- Joint Configuration: The type of joint and its configuration can affect heat distribution, thus influencing amperage settings for optimal penetration and fusion.
- Welding Position: The position in which welding is performed—flat, horizontal, vertical, or overhead—can require adjustments in amperage to maintain control and quality of the weld.
Welding Machine Type: Each welding machine type has specific amperage requirements based on its design and operation. For example, MIG welding typically requires lower amperage settings for thinner steel, while Stick welding may require higher settings due to the nature of the electrode and arc characteristics.
Electrode Size: The size of the electrode determines how much current is needed to effectively melt the metal. A larger electrode will require a higher amperage to achieve sufficient heat for welding, while smaller electrodes can operate effectively at lower currents.
Steel Thickness: Amperage settings must be adjusted based on the thickness of the steel being welded. Generally, for every 1/16 inch of steel thickness, a rule of thumb is to set the amperage to about 30-40 amps, ensuring adequate heat penetration for a strong weld.
Joint Configuration: Different joint types, such as butt, lap, or corner joints, can affect the amount of heat needed. In configurations that require deeper penetration, higher amperage may be necessary to ensure that the heat reaches the root of the weld joint.
Welding Position: Welding in different positions can impact how heat is applied and maintained. For example, overhead welding might require lower amperage to avoid excessive dripping and to maintain control over the molten weld pool.
What Common Errors Should Be Avoided When Setting Amperage for Welding Steel?
When setting the amperage for welding steel, several common errors should be avoided to ensure quality welds.
- Incorrect Material Thickness Assessment: Failing to accurately assess the thickness of the steel can lead to improper amperage settings. Thicker materials require higher amperage for effective penetration, while thinner materials need lower settings to prevent burn-through.
- Neglecting the Type of Steel: Different types of steel, such as mild steel versus high-strength steel, have varying heat requirements. Using a one-size-fits-all amperage can result in poor weld quality and potential structural weaknesses.
- Ignoring the Welding Position: The position in which welding is performed (flat, vertical, overhead) can impact heat distribution and penetration. Adjusting the amperage for different positions is crucial to avoid issues like excessive spatter or incomplete fusion.
- Failing to Consider Travel Speed: The speed at which the welder moves can significantly affect the amount of heat delivered to the weld. A slower travel speed may require a lower amperage setting to prevent overheating and warping, while a faster speed might need higher amperage for adequate penetration.
- Not Account for the Electrode Size: The size of the electrode used in the welding process should match the amperage setting to ensure the best performance. Using an electrode that is too small for the amperage can lead to burn-up, while one that is too large may not melt properly, affecting the weld quality.
- Overlooking Environmental Factors: External factors such as wind or humidity can affect the heat and stability of the weld. These conditions may necessitate adjustments in amperage to maintain weld quality and prevent defects.
- Relying Solely on Machine Settings: While machines often have preset amperage guidelines, relying solely on these without considering specific project requirements can lead to unsatisfactory results. It’s vital to fine-tune settings based on personal experience and the unique characteristics of the steel being welded.